Leveraging Kubernetes audit logs for threat detection
TLDR: Kubernetes audit logs can provide great visibility into the operation and inner workings of your cluster. It is also a good resource with relatively low startup cost to detect threats and anomalies inside your cluster. In this post, I will talk about shipping Kubernetes audit logs from Cloudwatch to Amazon Elasticsearch (ES). Once the audit logs are shipped to ES, we can create a Kibana dashboard to visualize the logs and set up alerts for threat and anomaly detection.
Kubernetes audit logs record requests to the Kubernetes API server. While they don’t monitor processes that run inside your containers and nodes (falco is a great tool for that), they can be used to detect privilege enumeration and escalation activities inside your cluster. Additionally, they can aid in the Incident Response process in which you may need to understand and build up a timeline of events.
Log shipping
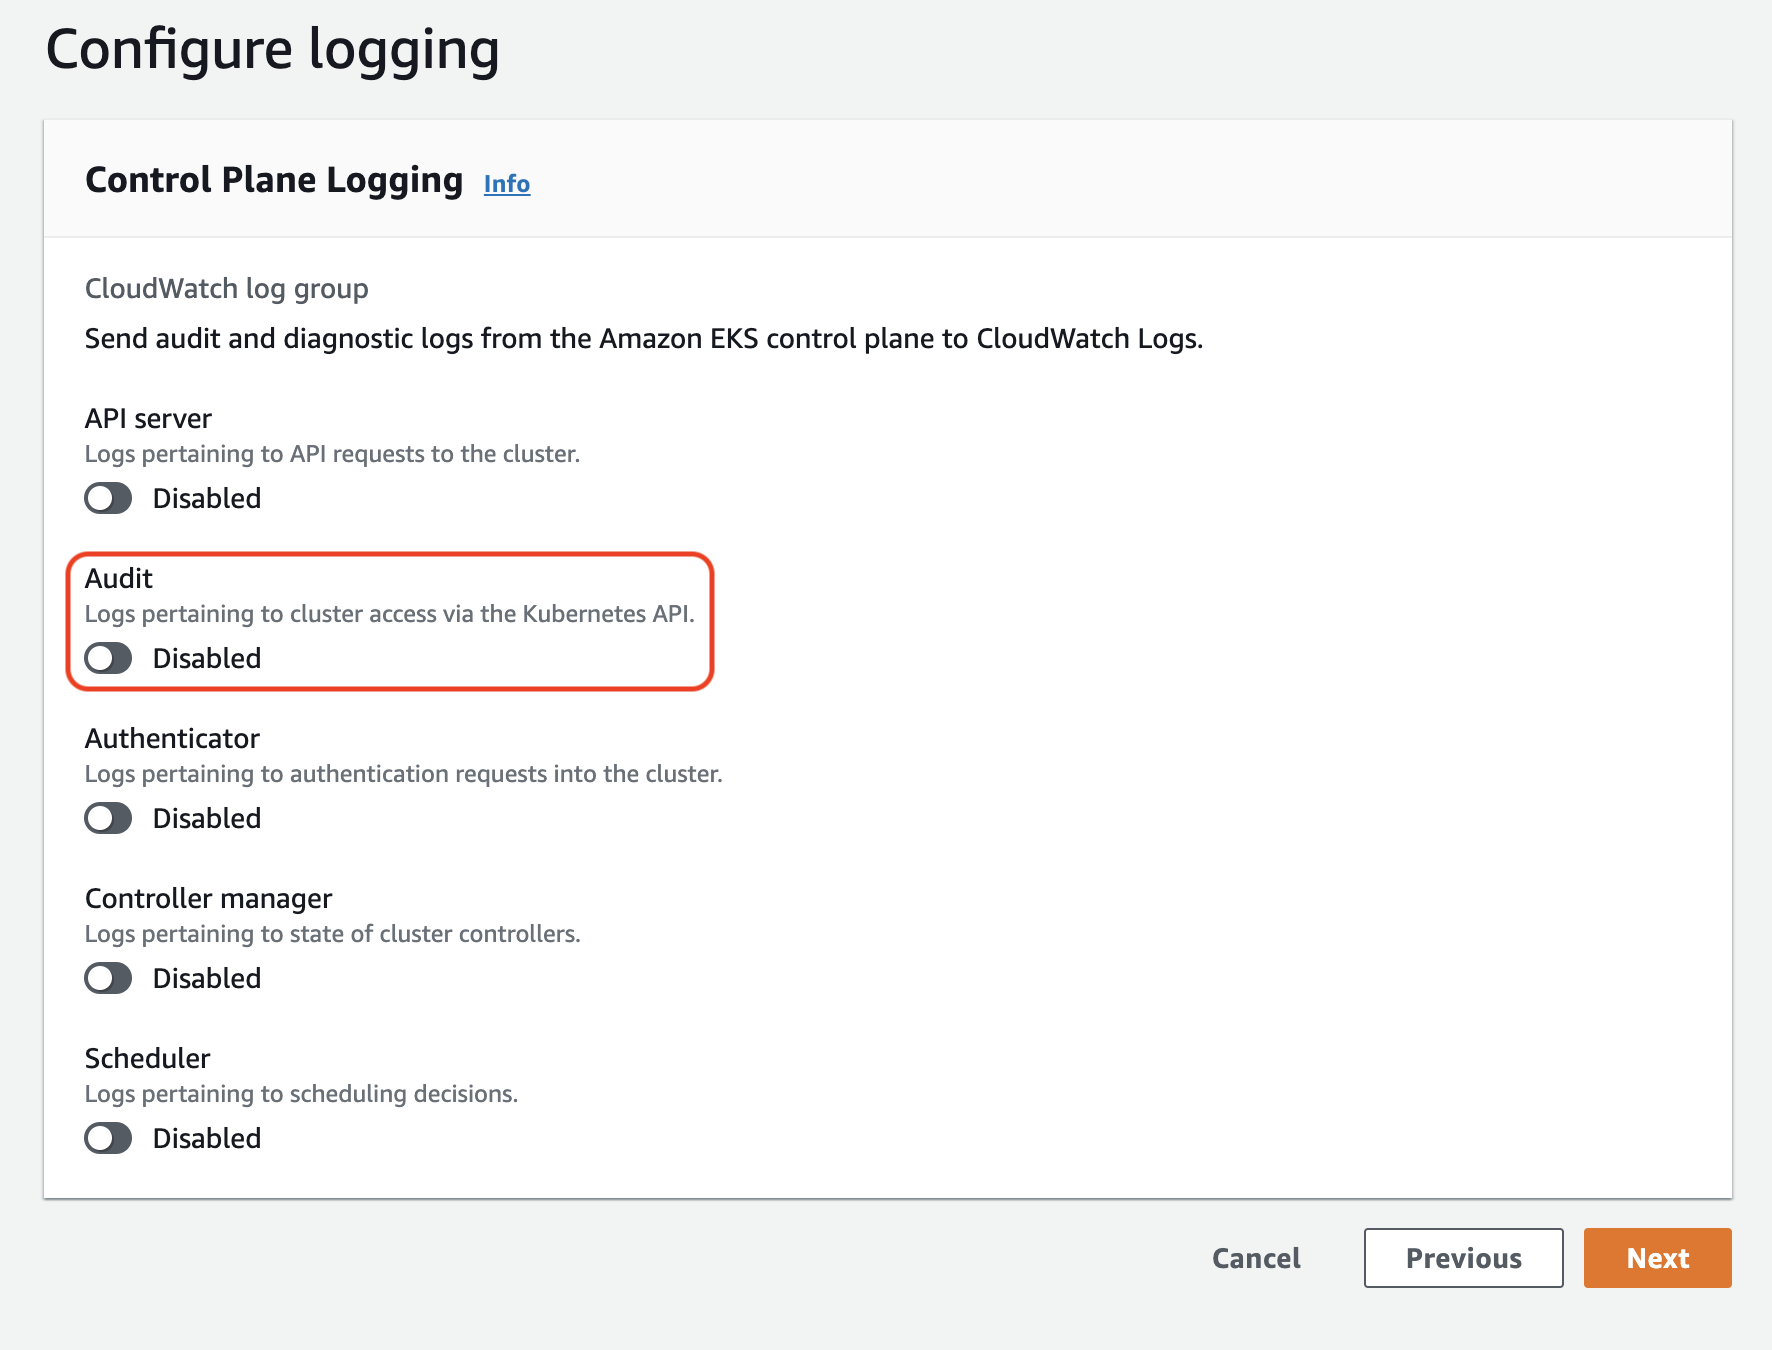
If you use EKS, turning on Kube audit logs is as simple as turning on the highlighted switch. The problem is that they are shipped to Cloudwatch which isn’t exactly easy to work with. It is certainly not my platform of choice to analyze logs.
A somewhat simple solution would be to ship them to the Amazon Elasticsearch cluster where you can use Kibana to visualize the logs and work your magic with them. There are at least two ways to do this:
- Use Lambda to ship the logs to Amazon Elasticsearch
- Use Logstash’s Cloudwatch input to consume the logs from Cloudwatch and send them to Elasticsearch. This has the additional benefit of sending the logs to another output for long term storage e.g. S3 etc
Even though number 2 is a better solution in the long run in my opinion, I went with number 1 for a quick POC so I will be talking about that approach in this post.
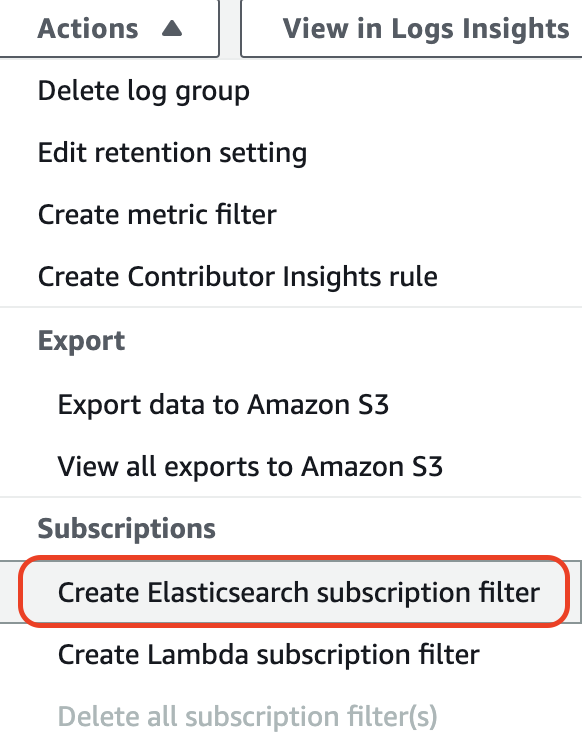
Go to your EKS log group in Cloudwatch -> Actions -> Create Elasticsearch subscription filter
Choose the Amazon ES cluster. Log format is JSON. For subscription filter pattern, I have the following to ignore request metadata:
{ $.level != "Metadata" }
And click “Start Streaming”. AWS will create a lambda function with all the necessary requirements so it can ship logs to the specified Amazon ES cluster.
Now, the pain is that not all logs will be successfully accepted by Elasticsearch. Some of the errors you see may look like below:
"object mapping for [responseObject.status] tried to parse field [status] as object, but found a concrete value"
"failed to parse [requestObject.status.active]""Can't get text on a START_OBJECT at 1:3087"
This is due to the inconsistencies in some of the Kuberenetes audit log fields. My understanding is that for example, if the first log that ES receives has an object for field A, and subsequently the next log comes in has a string as the value for field A, ES is going to throw this error and vice versa.
It is possible to fix this in either:
- Elasticsearch e.g. turning off dynamic mapping for problematic fields such as requestObject or reponseObject
- or in the Lambda script where you can catch problematic fields and convert them to objects in case they come in as strings. You can turn on debugging for the Lambda script and use Cloudwatch insights to look for all messages with ‘Failed Items’ to figure out the problematic fields.
Consuming the logs
Once your logs are rolling in happily to your ES cluster, you can start with creating an index for them and a nice fancy dashboard in Kibana to help you visualize the logs. To give you an example, it can look like this (some info has been redacted due to paranoia):
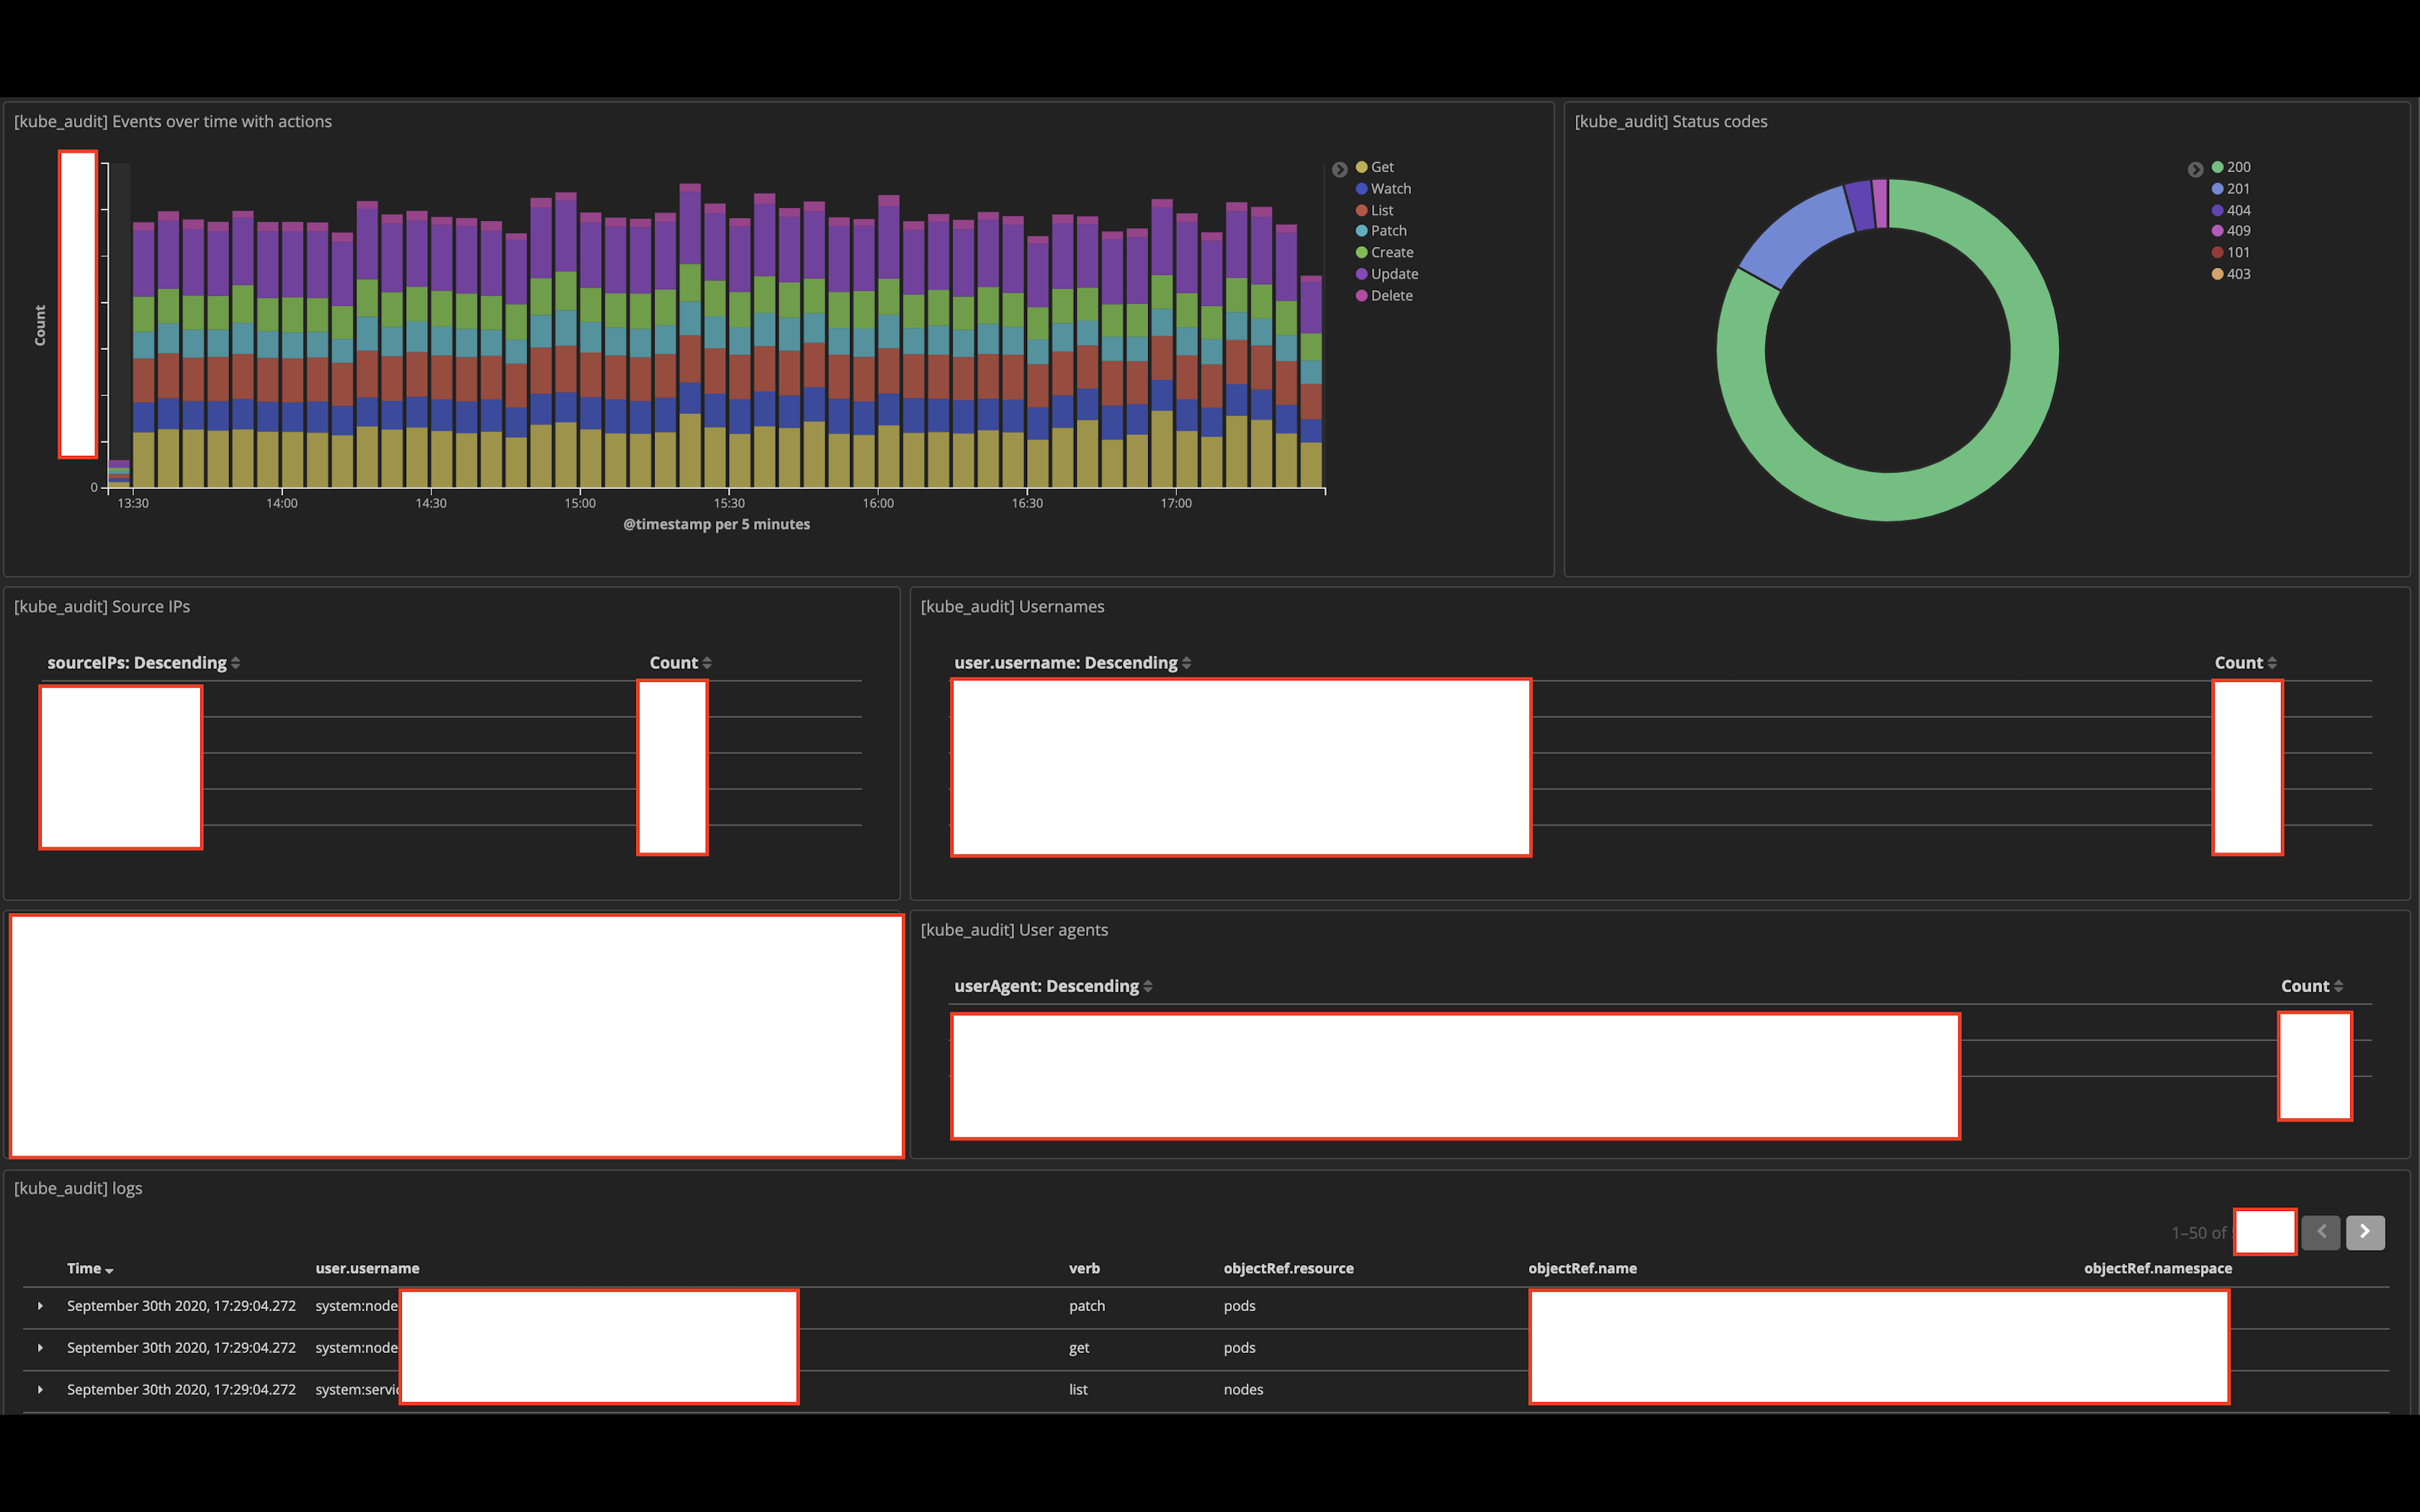
It helps a lot in detecing anomalies or in the event of an investigation since the dashboard can highlight the relevant information for you. For example, if you notice an increased amount of 403 reponses in that pie chart, something is probably not right. It could be misconfigured access controls or someone could be trying to enumerate privileges within your cluster. Or if you notice a spike in the amount of audit logs coming in in the middle of the night, something fishy could be going on too.
Threat detection
If you read my previous post on esclating privleges in Kubernetes, you can understand some of the basic approaches that a threat actor may adopt to escalate their privileges in Kubernetes.
The nice thing about Kubernetes from an attacker’s standpoint is that Kubernetes actually tells you exactly what privileges you have, unlike some other platforms where you would normally have to try every single action to map out a list of things you can do with that account.
kubectl auth can-i --list
# this command accesses the SelfSubjectRulesReview API which returns a full list of
# what a user can do

kubectl auth can-i <verb> <resource>
kubectl auth can-i get pods
# this command accesses the SelfSubjectAccessReview API which returns an answer of
# whether the user can perform certain action on a certain resource
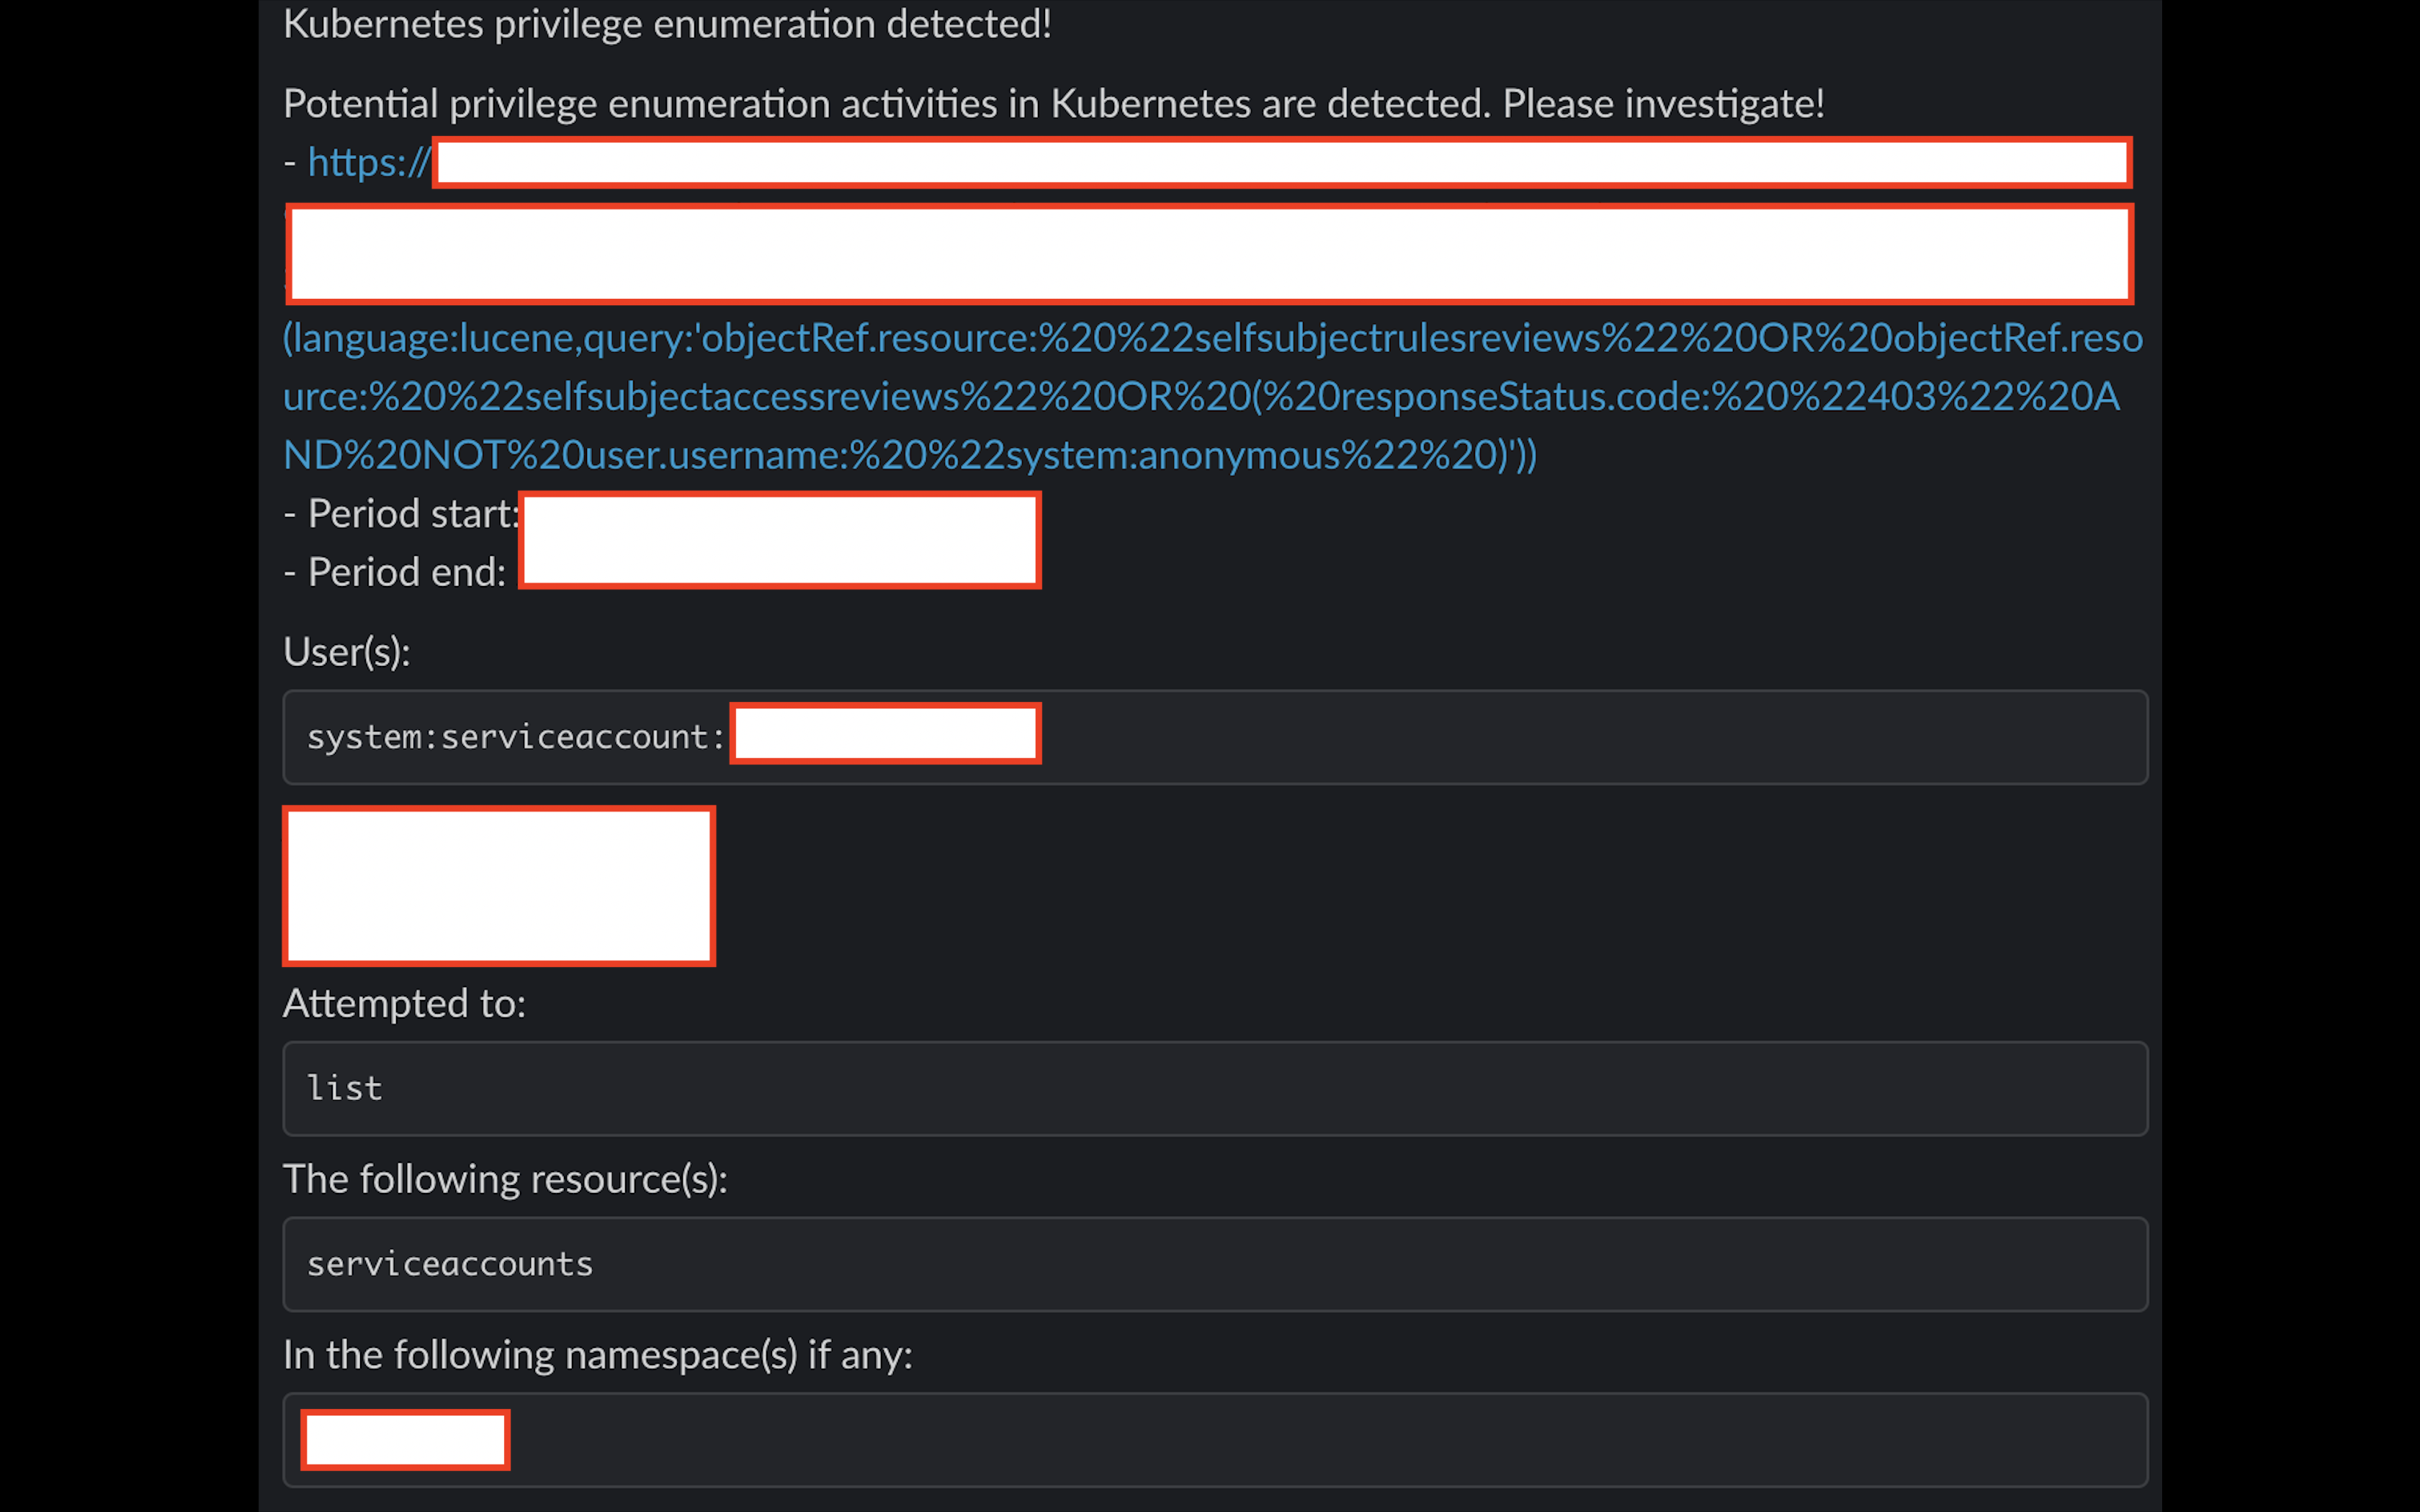
Now from a blue team’s perspective, you would probably want to know when these APIs are being accessed because it would be pretty damn weird if one of your service accounts in the cluster starts talking to these APIs. Additionally, it would be beneficial to monitor for 403 responses from authenticated users. As such, your Kibana query can be (additional whitelisting would probably be needed for your environment to reduce false positives):
objectRef.resource: "selfsubjectrulesreviews" OR objectRef.resource: "selfsubjectaccessreviews" OR ( responseStatus.code: "403" AND NOT user.username: "system:anonymous" )
With this query, you can set up a Kibana monitor and it will alert you immediately when these actions are detected. For example, an alert to Slack could look like this:
It’s a good start but let’s say the compromised container has a pretty powerful service account token mounted, cluster admin for example and the attacker doesn’t query the SelfSubjectRulesReview API. In this case, said attacker would slip right by the crack.
In this situation, what we could monitor is the userAgent field e.g. monitoring for requests coming from service accounts that have a userAgent field that starts with either ‘kubectl’ or ‘curl’. While this is definitely not foolproof as it is still possible for the attacker to change the user agent. It is easy with curl but it is not as straightforward with kubectl as far as I know (attackers would probably have to modify and rebuild the kubectl binary until that option is added).
It is also possible to route your kubectl requests through a proxy by specifying ‘HTTP_PROXY’ or ‘HTTPS_PROXY’ environment variables but it is not an easy task from an attacker’s perspective since Kubernetes uses mutual TLS authentication for the most part. However, in case a container that has a service account token mounted is compromised, that token is enough authenticate to the API server through HTTP basic authentication (although with kubectl, you also need the CA cert as well).
export HTTP_PROXY="<Proxy Address>"
kubectl --token=`cat service_account_token` --server <Public Kube API Server> --certificate-authority=<Path to Proxy's Root Cert> get pod
# now on the proxy, you can swap out the kubectl user agent for anything of your choice to bypass user-agent-based detection
# do note that this requires the API server to be publicly accessible


# using curl with custom user agent to bypass user-agent-based detection
# this can be queried from inside the cluster and does not require the API server to be public
curl <Kube API Server>/api/v1/namespaces/default/pods -H "Authorization: Bearer <service account token>" -k -A "random_user_agent"

# or

kubectl --token=`cat service_account_token` --server <Kube API Server> --certificate-authority=/run/secrets/kubernetes.io/serviceaccount/ca.crt proxy
curl http://127.0.0.1:8001 -A "random_user_agent"
Anyway, due to the complexity and inconvenience of these approaches, having a layer of detection based on user agent is still nice to have in my opinion as long as that is not the only layer you rely on. The Kibana query in such case could look similar to this:
userAgent: kubectl* OR userAgent: curl* and NOT user.username: "system:serviceaccount:<namespace>:<service account you want to whitelist>"
Wrapping up
After these two implementations, we now have 2 layers of detection. It is very much still a work in progress and it will probably never cease to be that way. Constantly adapt, constantly improve! The idea is to add many additional and sophisticated layers of detection, that like an onion, can and will make attackers cry as they try to peel! It is important to keep false positives to a minimum though, alert fatigue is not fun for anyone.
Final notes
There is no blanket approach when it comes to analyze Kubernetes audit logs and use them for threat detection as every environment is different. However, I hope some of the ideas discussed here can give you a good start on implementing further detection mechanisms in your Kubernetes environment, and improve your organization’s detection capability in the process.